
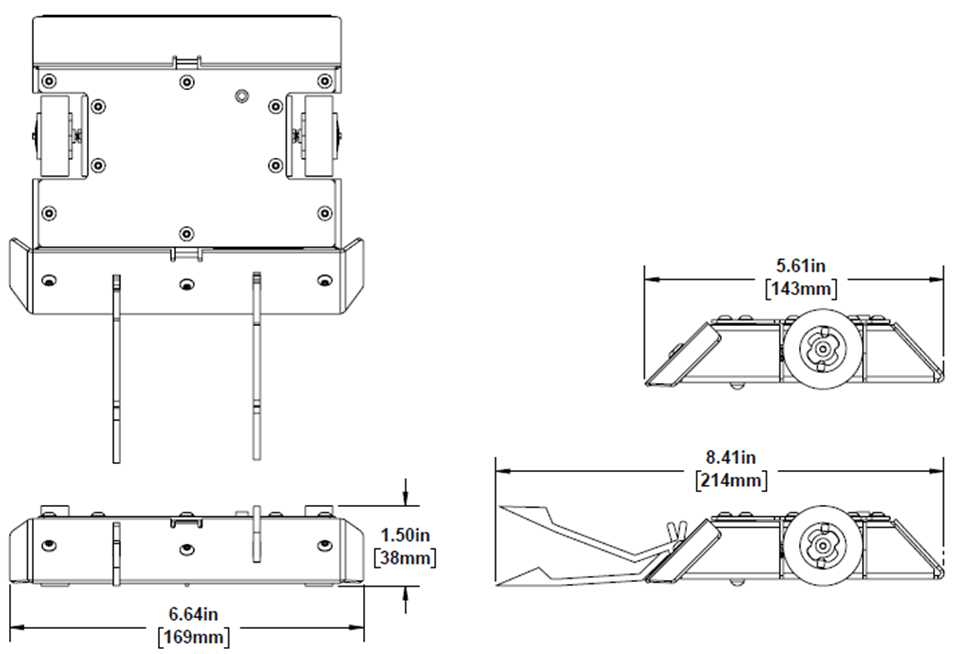
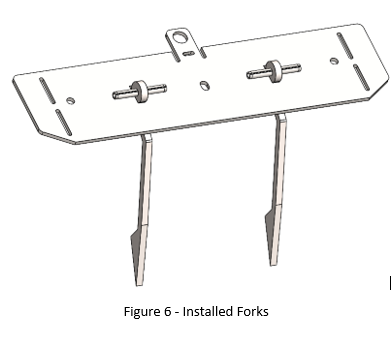
Trapezoid is a two-wheel drive, double wedgebot configurable between a wedge and fork mount with two-forks. The wedge and fork mount are mild steel for strength and formability. Being made from 0.074” mild-steel set at 45°, this wedge will do a good job of deflecting impacts. The forks are titanium and float along the arena floor to get under and disrupt the drive of opponents.
Trapezoid will maintain drive while inverted. In the fork configuration, the forks will continue to float across the floor while inverted.
On the underside, centered just in front of the tires, there is a round formed feature that is meant to reduce drive and steering drag. Other than the forks, this round feature and the tires are all that contact the floor in the upright orientation.
Parts List:
From Palm Beach Bots:
1x Pair of 1.5" Dia x 0.75" Foam Wheels: $3.02 4.6g Purchase Here
1x Fingertech Twist Hubs Wide 0.75" x 3mm: $18.99 14.2g Purchase Here
2x Repeat Robotics Brushed Planetary Motor: $35.98 54g Purchase Here
1x Fingertech 3.5 mm Switch/Charge Jack: $6.57 4.0g Purchase Here
2x Fingertech TinyESC with MiniQD Connectors: $53.38 7.4g Purchase Here
1x Palm Power 3S 300 mAh 65C Battery: $12.49 25.4g Purchase Here
1x Pkg #6-32 x 1/2" Screws: $2.09 13g Purchase Here
1x Set of Fingertech Terminal Blocks: $4.95 1.4g Purchase Here
From Menards:
1x Pkg #6-32 Threaded Inserts: $3.98 28.6g Purchase Here
2x 1/8" x 1" Steel Tension Pin: $0.72 1.8g Purchase Here
From McMaster-Carr
1x Pkg M2 x 2mm Button Head Screws: $11.82 0.4g Purchase Here
Purchase Parts Estimated Cost: $143.99
Manufactured Parts Estimated Cost: $53.92
Total Estimated Cost: $197.91
Optional Components (Recommended for new builders)
1x B3 Pro Compact Balance Charger 2s/3s: $9.99 Purchase Here
1x LiPO battery bag: $5.49 Purchase Here
1x Flysky FS-i6 2.4 GHz 6 Channel Transmitter: $52.99 Purchase Here
1x Latex paint bottle (For wheel traction): $12.99 Purchase Here
1x Blue Loctite bottle: $7.87 Purchase Here
1x Spare 18AWG wire: $13.98 Purchase Here
Laser Cut Files:
Build Instructions
Required Tools:
Hammer
Punch
Vise
Electrical Tape
Loctite
Wire Stripper
Threaded Insert Tool
Double Sided Tape
5/64" Hex Wrench
1.5 mm Hex Wrench
Fingertech Twist Hub Key
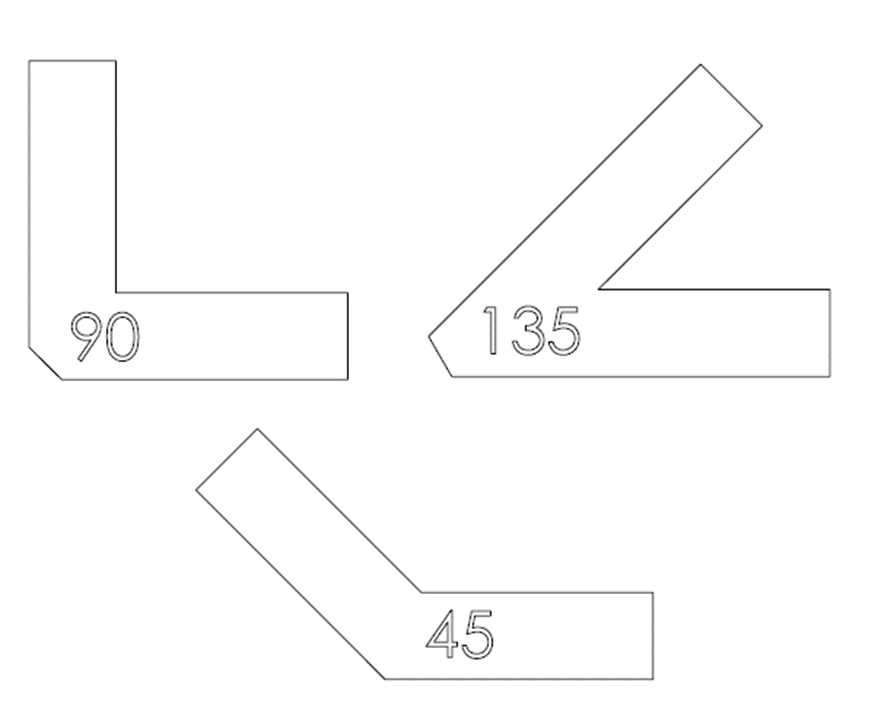
Provided Bend Gauges - Print and cut out
Manufacturing Parts
Many components in this build will need to be laser cut by a service such as SendCutSend. Here are the recommended materials for each part:
Frame: 0.063" 5052 Aluminum
Wedge: 0.074" Mild Steel
Fork Mount: 0.074" Mild Steel
Top Plate: 0.063" 6061 Aluminum
Forks: 0.125" Gr.5 Titanium (deburred)
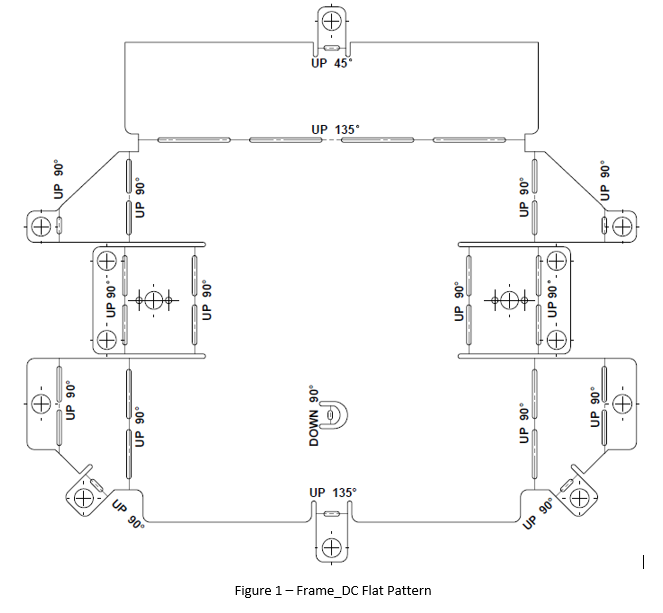
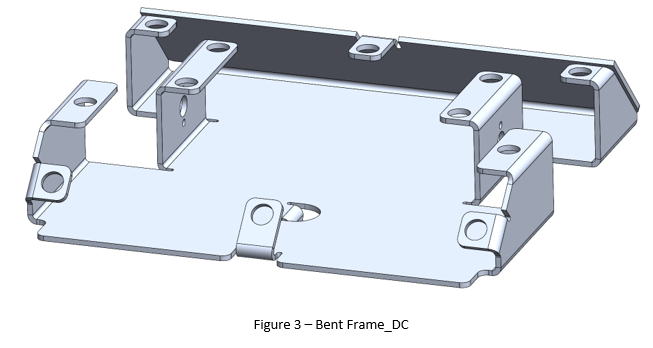
Once lasercut, the frame will need to be manually bent into shape. The slots cut into the frame create the bend lines. They allow the frame to be bent by hand (a small pliers can be used if needed). The notes on Figure 1 show you the direction & angle of the bend.
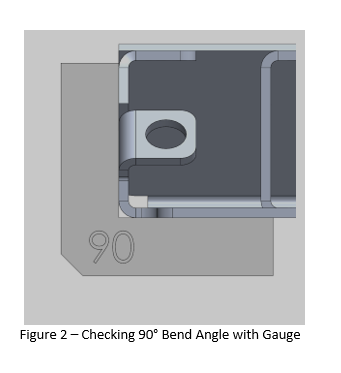
Print out the provided bend gauges to check that each bend angle is correct
Assembly
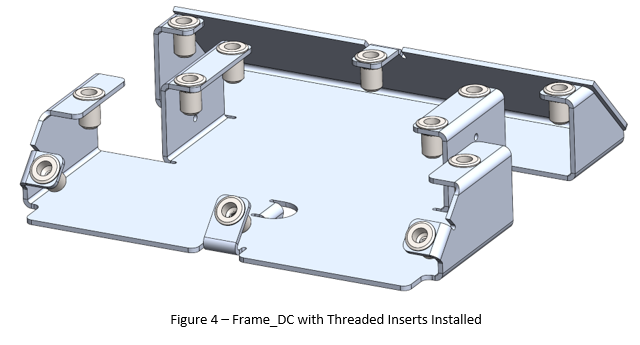
Step 1: Install Frame_DC Inserts
Using the threaded insert tool, install twelve of the #6-32 threaded inserts into the holes in the frame as shown (Figure 4).
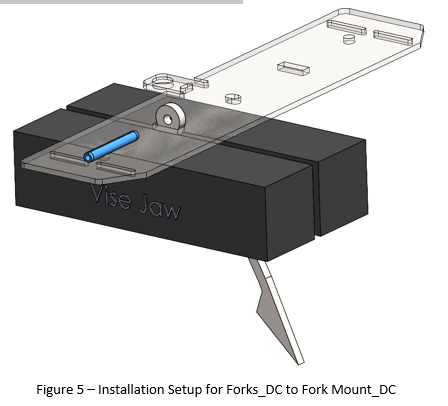
Step 2: Mount Forks_DC to Fork Mount_DC
Holding a fork in a vise, position the fork mount as shown and drive the tension pin into the hole in the fork using a hammer and punch (Figure 5; a punch shaped object like a long thin hex bolt or screwdriver, can be used if a punch is unavailable). Forks should rotate freely so they can float along the floor. Repeat from the opposite direction for the second fork.
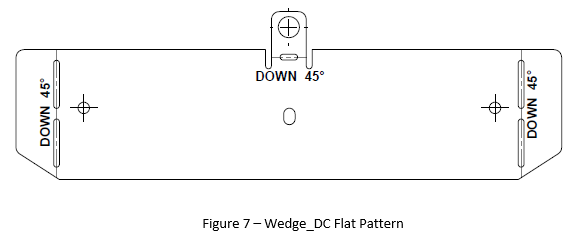
Step 3: Bend Wedge_DC & Fork Mount_DC
Bend wedge and fork mount per the notes in Figure 7 below. See Figures 8 & 9 for bent parts.
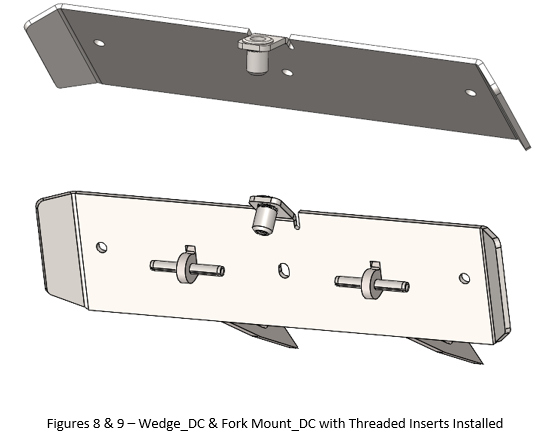
Step 4: Install Wedge_DC & Fork Mount_DC Inserts
Using the threaded insert tool, install #6-32 threaded inserts into the holes shown (Figures 8 & 9) in the wedge and fork mount (one each).
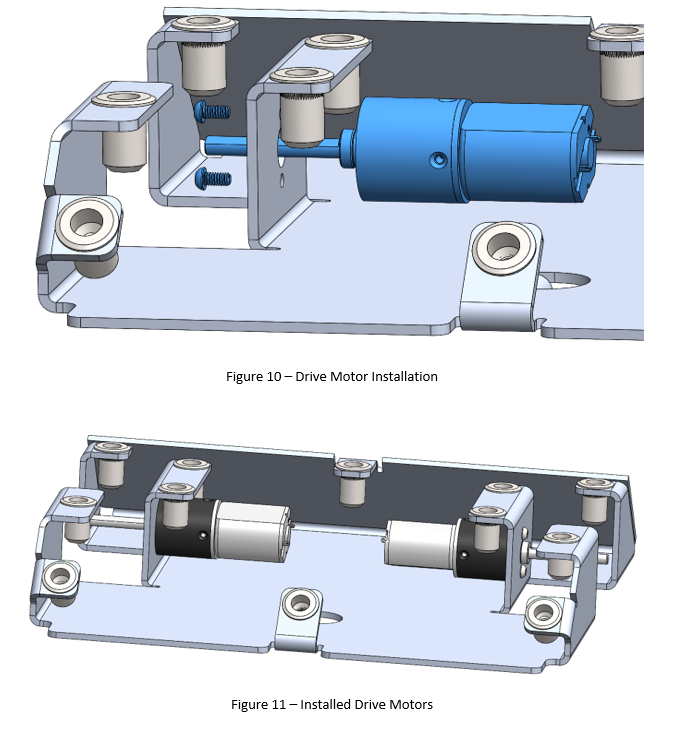
Step 5: Install Drive Motors
Using the 1.5mm hex wrench, mount a drive motor to the frame with the M2 x 4mm screws (two per motor, apply Loctite to screw threads to prevent backing out). Repeat on the opposite side.
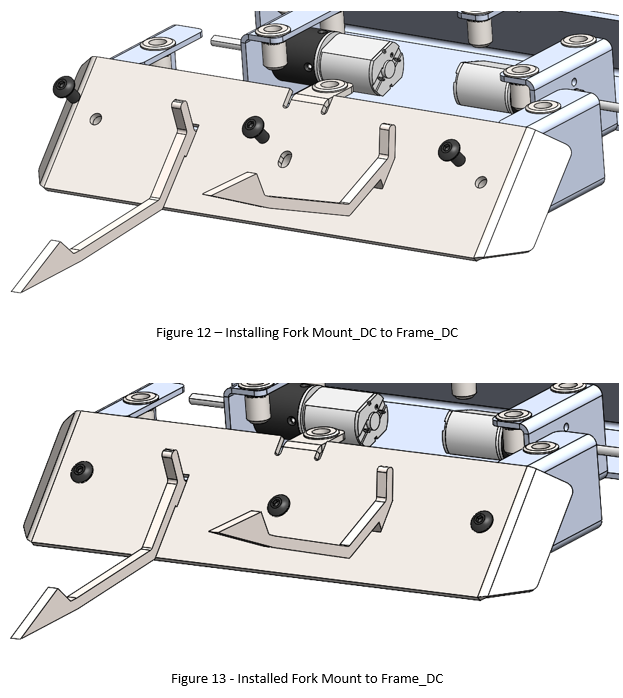
Step 6: Install Fork Mount or Wedge
Depending on the opponent robot, either install Fork Mount_DC or Wedge_DC. The Wedge is intended for fighting against horizontal spinning weapons. Forks are used against all other opponents.
Using the 5/64” hex wrench and three #6-32 x ½” screws, attach either the fork mount or wedge to the frame as shown in Figure 12. Apply Loctite to the screw threads to keep them from backing out. Tip: Setting the frame on a roll of tape (or similar) to raise it up may make this step easier.
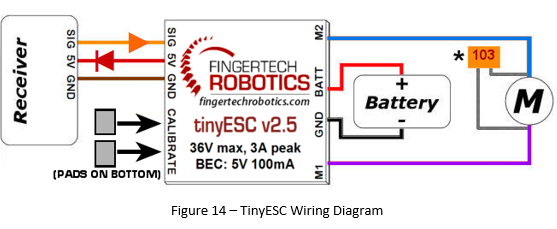
Step 7: Wiring
The wiring for this bot is the same as a Fingertech Viper Kit (with Repeat drive motor upgrade). There are a couple Witch Doctor Junior videos that walk through this wiring in detail. Video Links:
https://www.youtube.com/watch?v=UYv1pQnQvP4&t=237s
https://www.youtube.com/watch?v=enFKeOcjreE&t=98s
A wiring diagram for the TinyESC is below for reference as well.
Step 8: Install Electronics
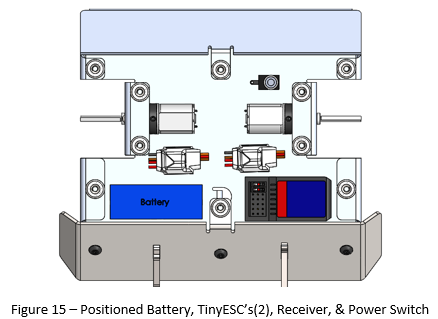
Position the battery, TinyESC’s(2), receiver, & power switch in the frame as shown in Figure 15. Keeping the heavier items towards the front will prevent the wedge/forks from lifting during acceleration. Once everything is in the desired location, tape down the battery and receiver using double sided tape. Wires can also be kept out of harm’s way using electrical tape or zip ties.
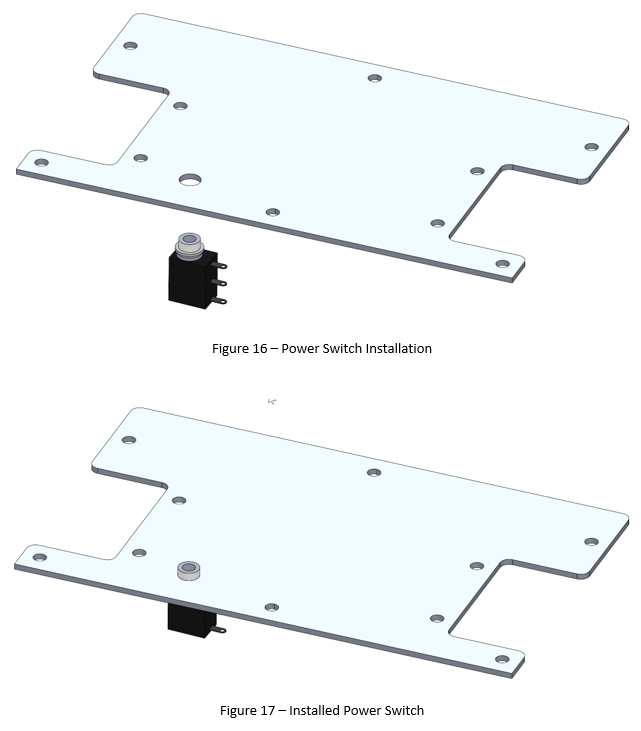
Step 9: Connet Power Switch to Top Plate_DC
Install the power switch in the largest hole on the top plate using the nut provided. Gently tighten with the grippers on wire strippers or a small pliers.
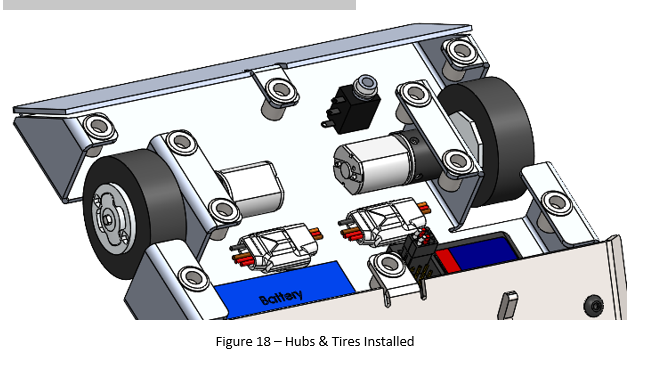
Step 10: Assemble Hubs and Tires to the Drive Motors
Follow the provided video from Fingertech on how to assemble and mount twist hubs and tires.
https://www.youtube.com/watch?v=9bB4ld3_DM8&t=2s
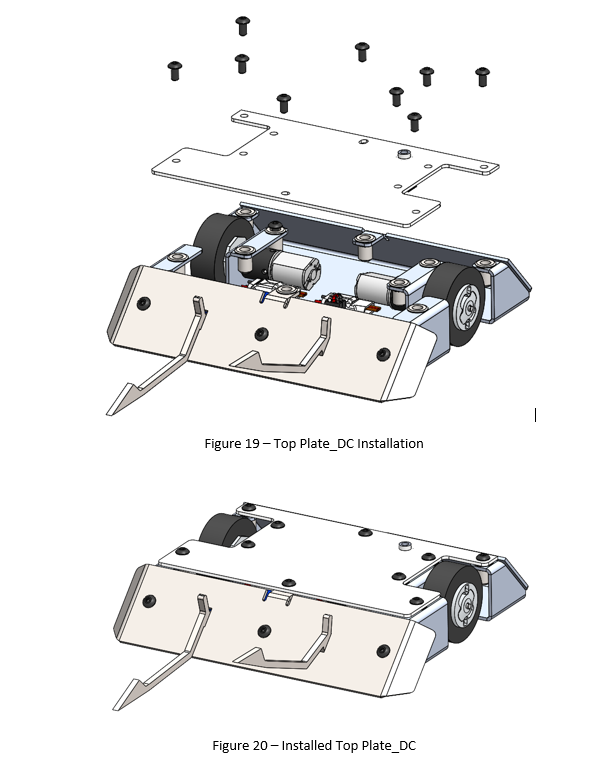
Step 11: Install Top Plate_DC
Using the 5/64” hex wrench, attach the top plate to the frame with the ten #6-32 x ½” screws as shown in Figure 19.
Next Level Considerations
At this point you have a functioning robot which you can practice and fight with. If you want to put in some extra work to gain an edge over the competition, here are some recommended improvements that can be made to the design
-Latex tires to add traction – Instructional Video Link: https://www.youtube.com/watch?v=M2dHKfS5BSw
-Solder wiring to create more robust connections
-Countersink the three wedge/fork mount holes and attach with flat head fasteners to give weapons less to grab
-Weld and grind smooth the bending slots in the wedge and fork mount – Again, gives weapons less to grab
-Design and 3D print top plate with features that help keep wires and electronics in place.
Conclusion
Once the robot is built, spend plenty of time on driving practice. Those who knw how to drive their robots are the ones who win competitions. One of the big advantages of Trapezoid over other kit bots is that a test box is not required to drive it around, so driving practice can be done on any hard surface.
When you are comfortable driving the robot, it's time to find an event to compete in. Check Robot Combat Events and Builders Database regularly to find one near you.
WARNING!
Combat robots are not toys and should always be treated with respect.
Always use a weapon lock and test in an adequate test box.
Design by Ben Thompson of Constructive Exercise